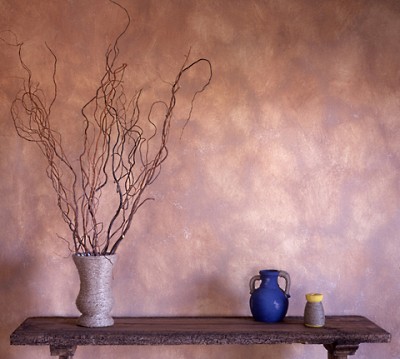
The look of a parchment faux finish is rich, warm and oh-so classy. By using the appropriate colors, you can transform even the coldest, most generic of spaces into an inviting room that looks as if it has aged over time. Simply put, a faux parchment finish makes walls appear as if they’ve been coated in layered sheets of antique parchment papers.
Commonly, the parchment effect is used in offices (home and corporate,) reception areas, home libraries, dens, entryways and powder rooms. The richness that the parchment effect offers is hard to beat with any other decorative painting technique. And guess what? It isn’t as difficult as you imagine. It’s easy to learn how to create faux parchment.
Tools and Materials to Create a Faux Parchment Finish
- Drop cloths or other protective materials for the workspace
- Tools to remove switch plate covers, etc. from the wall
- Blue painters tape
- A base color satin finish latex paint (enough to cover entire wall) (See Four Things to Consider When You Create a Faux Parchment Finish.)
- Two complimentary colors of flat latex paint (one light and one dark)
- Faux Technique Glaze (un-tinted)
- Two, 2″ paint brushes (nylon/polyester)
- Paint roller
- Paint tray
- Two disposable paint cups
- Cheesecloth
- Water
How to Create a Faux Parchment Finish
Prepare the wall.
Be sure the wall is clean and free from dust before beginning the faux parchment finish. Remove pictures, switch plates, etc. Use blue painters tape to tape off molding, trim, or any area you don’t want the faux parchment finish.
Apply the basecoat.
Using a paint roller, apply an off-white latex paint to the entire wall. Wait at least four hours for paint to dry and apply a second coat if necessary.
Tip: Be sure to choose a satin finish, as it is the easiest sheen to glaze over.
Prepare the glaze.
To prepare the glaze for your faux parchment finish, measure one part glaze (un-tinted), one part paint, and one part water. Once you’ve measured equal parts of each, mix them thoroughly in a disposable painting cup. Repeat this process for the other glaze.
Tip: The resulting mixture should be fairly thick.
Apply the glaze.
Start at the top of the wall, preferably in a corner. Work across the wall and top to bottom. Using a 2″ wide brush, paint a wavy line about one foot long. Then, paint another wavy line, 6″ from the first using the other glaze color. Apply a liberal amount of the glaze. You should end up with two wavy lines (one of each glaze color) approximately 6″ from one another.
Alternating the glaze colors is essential to creating the texture that the parchment effect is well known for.
Tip: Work in small sections (no larger than a 3’x 3′ area) so that the glaze does not dry before you can rub it.
Rub the glaze.
Hold the cheesecloth in a ball. Start at the outside edge of the wavy lines, and rub the two colors together using a figure-eight motion. The colors will blend nicely. Be sure that the ends of the cheesecloth don’t hang down out of your fist, as this may inadvertently smear the glaze.
Repeat applying the glaze and rubbing it together until you have covered the entire wall.
Tip: If the cheesecloth becomes heavy with glaze (it will be sticky) rinse the cloth with water and squeeze out as much water as possible, then continue.
Four Things to Consider When You Create a Faux Parchment Finish
Transforming a room with the look of old-world parchment is really a very straightforward decorative painting technique. But who can’t use a few tips? Here’s what the pros advise.
Choose Monochromatic Colors.
Choosing appropriate colors is essential to achieving the antique look faux parchment finish offers. Parchment is a two-toned paper that is usually light in color. For a traditional parchment effect, colors that feel “warm” are the way to go. So select earth tones, golden yellows, browns or cream if your goal is traditional parchment.
Of course there are other parchment colors that have been traditional in wedding and graduation invitations for years as well. Pink, pale blue, and pale green are also cooler colors that work well. Even pale peach works.
It is best to opt for two colors in the same color family. To ensure that the colors will work well together, look for the swatches that display five colors on one swatch. Choose the two colors from the same paint swatch. Pick one color you like and then chose another color, slightly darker or lighter from the same swatch.
Avoid Light spots.
Remember, you want areas of light and dark, so don’t be concerned if some areas are lighter than others. But you don’t want light “spots” or spots that did not get enough glaze where the basecoat shows through.
If this happens don’t fret. Merely dab glaze onto the cheesecloth and apply more glaze to that area.
Step back and scrutinize.
As you work your way across the wall, step back and take a good look at your faux parchment progress. The key to a professional job is consistency. While you’ll have lighter and darker areas, you don’t want large sections to be noticeably lighter or darker.
Use a Flat Top Coat.
I advise choosing a flat sheen for the paint used in the top coat glaze/paint/water mixture. Flat paint (vs. satin or glossy sheen) offers a more realistic parchment look.
Without a doubt, the faux parchment look is well worth the effort. Accent one wall, or apply the faux parchment finish to an entire room. Either way, after a few hours of labor, you’ll be basking in the glory of your handiwork. Congratulations on a job well done!


One Response
That was perfect.