Sponge painting is so much fun you might feel as if you are not really painting. The look is great when it is complete, and it also hides imperfections on your wall. Many people are finding that doing this themselves is not only fun, but the sense of accomplishment they have when it is finished is very satisfying. As a matter of fact, when friends ask you, “Who did your walls?” and you tell them you did, you might have a few more walls to do.
If you have never sponge painted before, you may want to practice on something unimportant before actually putting paint on your walls. Or you can go ahead and practice on your walls. You can always paint over what you don’t like with the base coat and start over.
Some people like the look of the top coat of paint allowing the bottom coat to shine through. If so, you’ll want to use a glaze.
If you prefer to keep the different colors separate and distinct, then work with acrylic paint that isn’t thinned with glaze. This can be handy if you find that you got a little too heavy with the color in one area. You just sponge on a little of the base color to balance things out.
What Will You Need?
- Painting supplies – tray and liner, paint roller, painter’s tape, base paint, top coat paint and faux glaze.
- Bucket
- Paint stirring stick
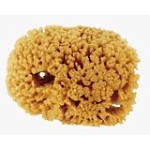
- A natural sea sponge or two
- Rubber Gloves
Preparing to Sponge Paint
Once you have assembled all the things needed to begin your project, you are ready to begin.
- Take everything off the walls.
- Wipe the walls down. This will get rid of any dust or dirt that would get mixed into your paint.
- Remove all electrical face plates and tape everything off that you do not want paint to get on using the painter’s tape.
Let’s Sponge Paint!

Put your base coat on the wall. This color should be a flat or satin paint of a light color. While you are waiting for the base coat to dry, you can prepare the next step of the painting process.
Using a bucket, mix the top color paint and the faux glaze by using one part paint and four parts glaze. Take the sea sponge and dip it in the mixture.
Blot sponge on a plastic plate to remove any extra glaze.
Starting in the corners, press the sponge lightly onto the wall. This should leave a bit of the glaze on the top of the first coat of paint you used. Remember tapping this color on lightly is the idea. Rotate your hand so you create a random pattern that will ultimately give your wall the great look it is going to have. Do not be too heavy handed.
When you have used all the glaze, dip the sponge into the glaze, and blot it again. Pick up where you left off working your way around the room.
It is best to do small areas and to avoid letting the edge where you left off have time to dry before starting again. If you need to, you can tear a small piece from the sponge to use in corners.
Take a step back from time to time and make sure the effect you are achieving is consistent. You’ll find that as you get tired, your technique will change, so it’s important to take those brief check breaks. You’ll also find that if you have to take more than one day to do the project or take breaks before you are finished that you’ll tend to work a little differently each time.
Finish sponge painting all the walls you are doing in the same manner and when it is finished you will have a beautiful new room with a unique look that is all your own. This is not an expensive project and can be done by a beginner if they follow the instructions.
Tips for Success
- If you use a light color for the base, using a darker color glaze will make the room appear darker.
- If you would rather have a light look, make sure the glaze is lighter than the base coat.
- Do not use totally different glaze and base paint especially where the tone of the paint is concerned. This will not achieve the look you want.
- Adding a light color over dark tends to look chalky even if you are using paint, not glaze.
- Always use a natural sea sponge. The texture of the sponge is the texture you’ll see on your walls. If you want an open effect, look for a sponge with large holes. If you want a subtle effect, look for one with smaller holes.
- Odd shaped sponges, especially ones that are pointed, can be easier to use in corners.
- Always wear gloves to keep the glaze from getting on your hands.
- Work your way from the corners out and this will help achieve an even and consistent flow.
- Clean up your sponge. You’ll be able to use it again.
It will feel good to empty your pans and put everything away. Take a break, relax and enjoy the beautiful new room you have created with just a sponge and some paint and glaze.


