Spraying paint is a great way to save time, but using an airless sprayer can also be dangerous or waste paint if used incorrectly.
Most painting contractors use an airless paint sprayer that can spray an average house in just a few hours, 6-8 hours is typical per coat. For regular house paint this doesn’t have to be a super large and powerful paint sprayer.
I will explain how to set-up and use an average sized piston style airless paint sprayer, the most common type. Plus, explain the parts of the pump involved and how to condition your paint for spraying.
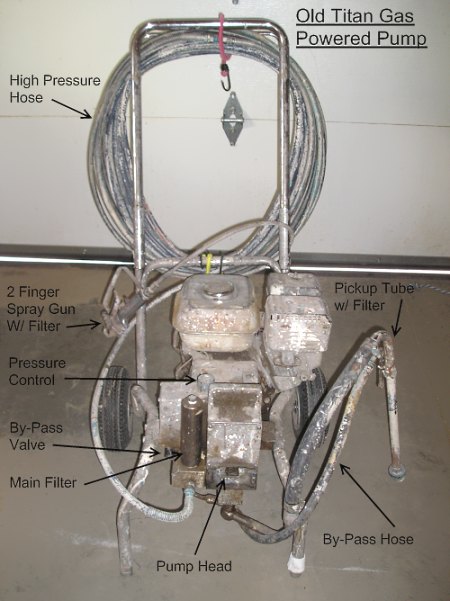
Parts of an Airless Paint Sprayer
The basic parts of an airless sprayer are quite basic, but each is very necessary. It is important that if you need to replace any part that original equipment quality or better be used.
 Motor – This is the part that provides the power needed to run the pump. On this model, Titan G390, a gas engine is used. Many models have an electric motor that is powerful, requires good dedicated power 15-20 amp circuit with nothing else plugged in. Gasoline engines offer portability and greater power for exterior coatings.
- Pump Head – This area contains the piston, packings and valves necessary to move the paint under high pressure. Typical pressures are from 1800-3000 psi.
- Pickup Tube – The pickup tube is attached to the pump head and put into the paint. The paint is drawn up the tube by the piston. At the bottom of the tube is a course mesh filter that is the first defense against sucking up gunk that could clog the pump.
- Main Pump Filter – This is the main filter for the entire unit. It is hear that most contaminates are caught. The most common filter insert is 60 mesh, but a finer 100 mesh filter can be used. Most paint applications are best filter through a 60 mesh paint filter. The actual design of the filter is specific to each manufacture and model.
- By-Pass Valve and Hose – This valve and hose assembly is used to prime the pump and relieve the pressure in case of an emergency.
- Hose Connection and High Pressure Hose – Special connections and high pressure hose is used on all airless pumps. These parts are designed for the high pressures and inferior substitutes can’t be used. The hose is available in 50 foot lengths with multiple sections combined, with special adapters, for greater reach and versatility. Each airless paint sprayer has a maximum supported hose length, usually 100-150 feet.
- Spray Gun with Tip – This is the business end that everyone knows. A good gun will be light weight and ergonomically designed for comfort. Contained within the gun is a final filter for the material being sprayed.
Setting Up an Airless Paint Sprayer
The basic setup procedure for setting up an airless sprayer is the same for both interior and exterior use. Some things to consider are; placement, straining and thinning or conditioning the paint and priming the pump. One more thing, place an old drop cloth under the sprayer even if the flooring isn’t installed or the pump in outside. When using an airless sprayer there’s always going to be some spills near the pump.
Placement
Choose a central location that will allow the maximum reach of the spray gun. All good sprayers can handle 100-150 feet of hose without any problems. Having a central location and more hose than the standard 50 feet will make spraying more efficient and minimize the number of moves.
Thinning or Conditioning the Paint
Most primers and paints are plenty thin right out of the bucket, but there are times and some good reasons to condition the material being sprayed. What you do with the paint depends on what you are spraying. Doors and other surfaces needing an especially smooth finish can benefit from the use of paint conditioners. Plus, a dry hot day can cause problems for acrylic primers and paints which dry very quickly.
Another thing to consider is straining the primer or paint before dipping the pickup tube. Many materials could have strings of partially dried material in the bucket before it is even opened. It is a good idea to strain the material before pumping it through the sprayer. Paint strainers are available in 5 gallon and 1 gallon bucket sizes.
Priming
Now that the paint or what ever you are spraying is ready go ahead and dip the pickup tube in. To prime most airless pumps you need to open the by-pass valve before starting the pump.
Turn the pressure down and place the by-pass hose into another bucket. Now open the by-pass valve and wait until a steady stream of material appears, you might have to increase the pressure a bit. Now close the valve and take the gun, without a tip, and pump some material into the original bucket. Be careful not to splash the material when the trigger is first pulled. This will remove all of the air from the pump and hose, readying the system for spraying.
Once all of the air is out of the system, attach the spray tip and adjust the pressure according to the material being sprayed. Now you’re ready to start spraying paint with an airless sprayer.
About the Author:
Crowder Painting in Colorado Springs delivers top-notch interior and exterior painting services with a focus on precision and quality. Contact us today!

