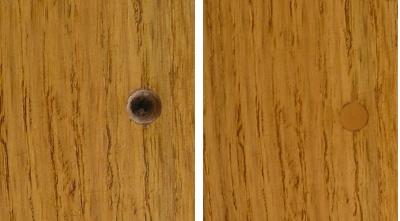
Staining Filled Areas Requires Hiding the Filler
Staining filled areas of wood furniture is a big concern because there is always the possibility that the filler will not absorb the stain. When you use wood filler on furniture, your goal is to hide the furniture’s imperfections and damaged areas, and the last thing you want is for those repaired areas to stick out like sore thumbs when you apply stain on top of them.
It is absolutely true, in some cases, that areas on wood furniture that have been repaired with wood filler will not appear uniform with the rest of the piece when it is re-stained and re-finished. When wood filler is applied to wood that is not finished, the fix can blend very well with the piece and be almost unnoticeable. However, when stain is added on top of those areas, the stain tends to pool around the perimeter of the repaired area, which results in a ring of darker stain. Or, the result might look splotchy.
How to Prevent Uneven Staining
There are a few methods that can be attempted when dealing with furniture that has wood filler in several places. The biggest issue is determining which method will work the best with specific types of wood and specific types of wood filler.
- One of the most popular choices for situations involving wood furniture that has been repaired with wood filler is using a pre-stain conditioner prior to adding the stain. In the best case scenario, the wood should be conditioned before the wood filler is applied to the damaged areas. Also, when using pre-stain conditioner, make sure to follow the manufacturer’s recommendation on how quickly stain should be applied after the conditioner has been added.
- Add the wood filler to the damaged areas of the furniture before the entire piece of furniture is sanded. By adding the wood filler first, the wood surrounding the repaired areas will be flush with each other after sanding.
- Make sure to choose wood filler that matches the color of the wood stain as perfectly as possible. By choosing a color that matches, the chances of the filled areas appearing as different colors when the stain is applied can be minimized.
How to Fill Holes and Damaged Areas Prior to Adding Stain:
When you decide that you are going to refinish a piece of wood furniture and you evaluate the furniture to determine if it is a good candidate for restoration, you might notice several areas that should be repaired with wood filler. Prior to re-finishing the piece and adding stain, you are going to want to fix those areas.
Steps to adding wood filler to furniture that will be stained:
- Clean the area in need of repair by cleaning and scraping it with a screw driver or a chisel.
- Use sand paper to smooth the area and make it even.
- Select wood filler that can be stained or a wood filler that matches the color of the stain that will be applied.
- Apply the wood filler to the areas that were prepared.
- Wipe off excess wood filler using a clean cloth.
- When dry, use sand paper to smooth the surface and make it even.
- Clean the area so there is not any left-over dust.
- Check to make sure the surface is as smooth as possible by rubbing your hand over the surface.
- Apply the stain over the entire piece of furniture and allow it to penetrate.
- Wipe off the remaining stain with a clean cloth.
- When the stain is completely dry, look at the areas that were repaired with wood filler and determine if they blend well.
When staining filled areas of wood, you may notice that the areas appear darker than the rest of the piece after the stain is dry. If this is the case, you will want to add another coat of stain in hopes of darkening the wood enough to match the filled areas more precisely.

