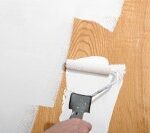
 Painting paneling is an easy project and it looks great when finished. There is a series of steps that’s required before the paint is applied to the paneling. These steps are cleaning, apply a primer, fill nail holes and then finally paint the paneling.
The goal of all this work and separate steps is to paint the paneling with a finish that will stand up to the test of time and be easy to maintain. These steps can be applied to “real” wood paneling as well as the cheaper “photo” types of paneling.
Step 1) Clean the Paneling
The paneling will have to be cleaned before priming, especially if it was previously painted or finished. Cleaning is particularly important for smooth “photo” types of paneling or if previously varnished. The extent depends on the area and the amount of gunk that has to be removed. The places to pay special attention are the kitchen and bathrooms. Grease or soap residue will interfere with the primers ability to adhere to the paneling.
A great way to clean paneling before priming is by using no-rinse TSP (trisodium phosphate). I recommend rinsing with fresh water even though the directions of the No-Rinse TSP say it’s not necessary.
Another way to achieve a clean surface is to wipe the paneling with a liquid sander/deglosser, I like Paso. Unfortunately it has a strong solvent smell but is a quick way to get the paneling ready for priming.
Both methods will work well and, usually, physical sanding isn’t needed. I use a combination of methods, washing kitchen areas and wiping with Paso on other areas.
A great way to clean large areas quickly is to use a sponge mop with a handle. Use rolled old towels at the bottom of the walls to catch any running water and mop just like you are rolling the wall. After sponging an area rinse it with another mop and fresh water. Allow the washed paneling to dry for a few hours then mask any areas that will not be painted. Now is a good time to remove the switch covers, outlet covers and any lights.
Step 2) Priming Paneling
In order for the paint to fully adhere to the paneling it will need to be primed. This is an important step when painting paneling. I like to use a quick drying oil base primer, such as Kilz oil base or Zinsser Cover Stain.
A good acrylic will also work but the oil base primer will stick better and seal more types of stains. If you choose an oil base primer, plan on discarding the roller cover instead of using it for painting the paneling. For the acrylic primer, use the same cover as the finish paint. The cover needs to have a short nap, 1/4 – 1/2 depending on the desired finish texture. The primer is applied the same way as the finish paint.
Step 3) Fill the Nail Holes and Cracks in the Paneling
After the primer has dried, typically a couple of hours, the nail holes and cracks between the panels can be filled. I like to use light weight spackling paste for nail holes. Simply apply with a finger to each hole, slightly over filling. Allow to dry then lightly sand with a medium/fine sanding block.
The cracks can be caulked or covered with small wood trim, screen molding works great. If you choose to caulk the cracks, immediately after applying wipe the area with a damp soft rag. This will smooth out the caulking. The cracks might have to be re-caulked prior to painting if they are large or deep.
Step 4) Begin Painting Paneling
Finally it is time to start painting paneling. Use good quality paint in whatever sheen you like. Since the paneling is smooth it’s appropriate to use a short nap roller, 1/4 inch to 1/2 inch. A 1/4 inch roller nap will produce a fine even stipple or texture. A lamb’s wool roller is the best and will produce the best looking finish.
Begin by cutting in all areas with a brush around the paneling, next to the floor and ceilings plus around any attached fixtures. Cut in the corners as well as around outlets and switches. Keep the brushed paint even; don’t leave any heavy thick lines. Thick brush marks will show through the rolled paint after it has dried.
Rolling is the same as for any room except the paneling is ultra smooth. Apply 2 or more thin coats of paint instead of one thick coat. You will have to work the paint a bit more than a normal wall. Try to produce an even roller stipple. Apply as many coats of paint as necessary in the same way. The finish needs to dry for a couple of weeks before any washing can take place.

