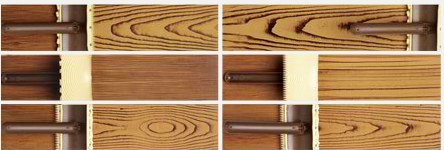
The Faux Oak Wood Graining technique is often used on cabinets. This method of achieving an oak wood grain begins with a light color base, but unlike the glaze method, the stain method uses a heavy bodied wood stain for the oak wood graining.
Before starting your faux oak wood graining project, it is wise to test the base, stain and glaze color you chose on a scrap piece of wood. Be sure the colors work together. Then practice the rocking technique until you’ve perfected it.
Tools and Materials To Create Faux Oak Wood Grain Using Stain
- Drop cloth or other protective material
- Tools to remove hardware such as handles
- Cleaning supplies to prepare cabinet surface
- 120-150 grit sandpaper or sanding sponge
- Lint free cloth
- Two or three 2″ or 3″ natural bristle brushes or foam brushes
- Rocking tool or rollers
- Quick drying latex primer
- Wiping stain
- Polyurethane or varnish
Directions for Creating Faux Oak Wood Grain Using Stain
- Prepare surface. Remove door from cabinet, and remove any hardware like knobs and hinges. Clean the door with mild soapy water and a damp sponge. An old toothbrush dipped in soapy water will help loosen the dirt that builds in corners over time. Let dry completely. Lightly sand all surfaces and remove all dust.
- Apply primer. A quick drying latex primer is an excellent choice. Using a two to three-inch soft nylon bristle or foam brush, apply at least one coat of primer to the cabinet door, and let dry thoroughly. An oil base primer can also be used, but in that case, use a natural bristle brush.
- Apply base coat. Use a latex base paint if the primer is latex. A light-medium tan usually works best. A brush or a roller can be used to apply the base coat. Finish all brush strokes in the same direction as the wood grain. Apply sufficient coats as needed, but it should not require more than two. Allow 24 hours drying time before starting the oak wood graining.
- Apply 1st coat of stain. Lightly apply a coat of wiping stain with a bristle or foam brush. Keep this coat light and smooth, as it will help define the faux wood grain. Blend heavy areas to reduce the blotchy look. Brush in the direction of the wood grain and allow 12 to 24 hours for complete drying.
- Apply second coat of stain. Apply this coat in the same manner as the first, except spread the stain one section at a time. While the stain is still wet use a graining tool, the same technique same as step 4 in the glaze method. Repeat on the next sections and allow to dry completely.
- Apply protective coat. Use polyurethane or varnish using a soft bristle or foam brush. The coating will protect and help bring out the faux wood grain.

Wood Graining Tips

- Metal, fiberglass and other smooth surfaces. – Determining the direction of the wood grain can be difficult. For doors the board (sections) running vertically on the far right and left has vertical grain. Horizontal sections have horizontal grain. For cabinet’s drawers run horizontally, tops run horizontally and doors run vertically.
- Joining the stain where there are joints or cross-grain. – Mark a light line with a pencil and apply tape along the line. Immediately apply the stain and carefully make the wood grain pattern using your graining tool, up to and slightly onto the tape. Carefully remove the tape when satisfied wit the result. Never leave the tape in place overnight.
Before starting your faux oak wood graining project, it is wise to test the base, stain and glaze color you chose on a scrap piece of wood. Be sure the colors work together. Then practice the rocking technique until you’ve perfected it. Remember, using rocking tools in a variety of designs and widths will produce terrific results when used properly. Finally, be patient.


3 Responses
Really this is very informative post, thanks for sharing.
I have old pine that has only a clear on it so that the grain is very contrasted to the other body color. It is an orange-brown color with a darker color and a lighter color of the same value. I have successfully replicated the two colors using acrylic paints in very small batches. I would mix the colors and paint them directly onto a piece of finished scrap trim until I got a match. I need to replicate enough color to paint four-door casings.
I have a few questions:
1. Do I have to use the same wood or can I use anything to replace the original wood since it is being painted?
2. Which color do I paint first the light or dark? I am planning on using a graining tool.
3. Should I seal the first base coat so that the second grain will slide easier?
4. Should I lightly mist or hit some of the wet edges with a fine brush with water to bleed the edges some?
I can’t think of anything else.
Thank you.
1- You can use any stable wood. Make sure to primer first.
2- Typically dark over light. You might need to play around with different combos and see which works best for you.
3- Use a satin paint. If all you have is flat then a clear coat is needed.
4- Preferences; This is up to you and depends of the final look your after.